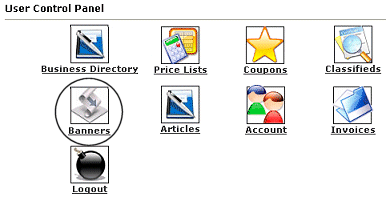
Home Advertising Ashburn Saving Center Business Directory Contact Us Events Calendar eSports Now Games Fantasy Home Buyers Analytics National Weather Service Real Estate Recommended by Locals Internet Minute Who's Online Site Map Tickets FINDER LoginRegister
 Navigation

  Home
 
  Adopt Pets
 
  Adopt A Pet Campaign
 
  Advertising
 
  Articles
 
  Ashburn Connect Forum
 
  Ashburn Saving Center
 
  Auto Sales
 
  Blog
 
  Business Directory
 
  Business Leads
 
  Classified Ads
 
  Contact Us
 
  Coupons
 
  Daily Horoscope
 
  Demographic Trends
 
  Entertainment Trends
 
  Economic Trends
 
  Events Calendar
 
  Family Living
 
  FAQs
 
  Fashion Trends
 
  Financial News
 
  Find a Friend
 
  Garage Sale
 
  Guestbook
 
  Home Decorating
 
  Homework Help
 
  Investment Trends
 
  Just For Fun!
 
  Kids Games
 
  Kids Zone
 
  Link to Us
 
  List Your Ads
 
  List Your Jobs
 
  Local Gas Prices
 
  Local Jobs Trending
 
  Local Links
 
  Local Schools
 
  Local Weather
 
  Lost & Found Pets
 
  National Weather Service
 
  News Channel
 
  Politics Trends
 
  Real Estate
 
  Refer A Friend
 
  Sports Videos
 
  ESPN Sports
 
  Sports Trends
 
  Technology Trends
 
  Travel
 
  Volunteer Guide
 
  Wedding Zone
 
  Workforce Trends

 User's Guide - Banners/Ad Zones

Banners/Ad Zones

Banners ads are a great way to gain online exposure for your business. They are highly visible and easy to create! Your banner may need to be approved by the website administrator before becoming visible on our website.

 
In order to add or edit a banner, you will want to login to your account. Click on the icon that is circled in this image (Banners).

Once you have clicked the icon, you will see a tabbed menu similar to the one below...


If you do not currently have any banners on this site, you will be able to purchase from this page.  We have several advertising options and placements available throughout the site.

Current Banners tab
This tab shows you any banner ads you may have already placed on our site and will allow you to view both the number of impressions (how many times your ad has been displayed) as well as how many clicks (how many times a visitor has clicked your ad for more information) your banner has received.


Add a Banner tab
This allows you to purchase banners to be displayed on our site

If you currently have no banner credits available you will need to purchase them before you can upload your banner ad image.

Note: Each banner credit is good for 1 month. Example: You purchase 15 banner credits, each of which is valid for 1 month. If you wish to run a banner ad image for several months, you can combine banner credits and use the drop down bar to select 15 months now. Or, you could either create 15 individual banners for 1 month each. 


Invoice Description:
This page is an itemized list of the purchases you made along with the total due. If you chose to mail in the payment, you will find the mailing address on this page as well. Please make sure to include your name, username, and business name. When you are finished click on Return to take you back to your User Control Panel. Now you can add your Banner by following the below steps.


Adding Banners

To place a banner image in our Top Banner Rotator, you would click the 'Order Top Banners' if you wish to create a top banner. Or you can choose to place your banner image in any of our other ad placement options shown on this page.
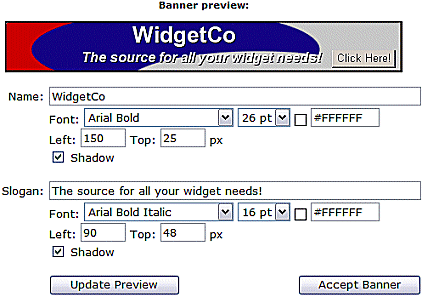
After selecting the type of ad banner you wish to place, you will see a short form like that shown in the image to the left. 

First select whether you will be choosing to upload your own banner image (gif, jpg or bng file) or whether you wish to instead use a flash banner or remotely hosted banner and will instead be entering the proper HML to call the image/file from another Internet location.

If you will be uploading an image file, you will use the Browse button shown to the left to search your computer's hard-drive for the image you wish to upload for the Banner Image


The Destination Url is for specifying the correct web address for which the visitor would be brought when the ad is clicked. This url must be a valid url and should begin with http:// or a linking error may occur.

For Flash ads or remotely-hosted banners, you will need to click the option titled: Use custom HTML (for Flash ads or remotely-hosted banners). Once selected a field titled 'Banner HTML' will appear for which you can enter the appropriate HTML for your ad image or flash object.

When finished making your selections, click the Create Banner Button.

Your banner image may not be displayed until after review. It will remain as (Disabled) status until that time. Once it has been reviewed and approved, you can monitor your banner ad by returning to the User Control Panel and clicking the Banners icon. This will show you the banners you have advertising with us.


The Loc tells you in which area the banner displays (top of the page, and bottom of the page, respectively). 

The Url is where a visitor is brought if the ad is clicked. 

Impressions tells how many times the banner ad has been displayed.

Clicks
is how many times a visitor has clicked the banner ad, and Expiry is when the banner will br deleted from your site.
    

Clicking the Edit link allows you to access the Banner Details section to edit any current information. (the banner edit may be disabled by the website administrator)

Clicking the Delete link will delete the banner. (this cannot be undone).


Banner Creator tab
This tab is for those who wish to place a banner ad on our site, but *who do not already have an ad image of their own* to use and wish to create one! If you already have a Banner Ad image, please click the Add a Banner tab.


This is makes creating a banner incredibly easy. We offer a variety 'banner blanks'. A banner blank is an image in the correct image size that is currently waiting for a business name and slogan to be added. After clicking the Banner Creator link, in the User's Banner Area, you can choose a blank banner template by clicking the circle below the Choose option to the right of the banner image. This will be the foundation upon which your new banner will be built. Then you will need to click the Continue button at the bottom of the page.

Next, you will see the banner you choose. Then you will be able to add information to the banner.


Enter the name of your company and your slogan (or other information) in their respective fields as shown in the image to the left. Next, choose a font style, size and color for the name and slogan.

Then, decide where on the banner you would like the name and slogan to appear. The numbers in the 'Left' and 'Top' fields determine where the top-left corner of the text will appear on the banner. (Increase the 'Left' value to move the text to the right; increase the 'Top' value to move the text down.)

To preview your changes, click 'Update Preview'. When you're satisfied with the result, click 'Accept Banner' .

You will then be asked to download your your completed banner. This is very important because creating your banner image does not make it automatically display on our site. You will still need to follow the steps above in the Add a Banner section of this tutorial to complete your order.


Close this browser window to return to the Guide.

Home Advertising Ashburn Saving Center Business Directory Contact Us Events Calendar eSports Now Games Fantasy Home Buyers Analytics National Weather Service Real Estate Recommended by Locals Internet Minute Who's Online Site Map Tickets FINDER LoginRegister
Copyright 2024, AshburnConnect.com